When it comes to using private proxies with various tools, the theory is simple. All you have to do is to divert the tool’s internet traffic through your proxy or proxies. Setting Massplanner proxies, or better said, setting social media proxies in Massplanner is no different.
Even if all public or private proxies look the same – a series of numbers – when it comes to implementing them, it can get a bit tricky mainly because each tool has a different dashboard and proxy manager.
What Massplanner proxies to buy?
I am sure most of you will look online for Massplanner proxies. But, technically, this is not right.
From a user point of you, looking for Massplanner proxies makes sense. Because all that he wants are working proxies for Massplanner. Proxies that will be used to connect to a social media platform.
BUY PROXIES FOR MASSPLANNER HERE
Therefore, the right question is what social media proxies for Massplanner should somebody purchase? Our straight and definitive answer is to get any special use private proxies package. Such as Instagram proxies or Pinterest proxies. These are just private proxies, usually virgin proxies, allocated especially for the social media platform of your choice.
While at their core, all these proxies are dedicated private proxies. But, by buying special use packages, i.e. Instagram proxies, you are guaranteed to connect safely to the social media platform. Therefore, when you hear Massplanner proxies, think of private proxies for social media.
Access your proxies list
For our tutorial, we have used Instagram proxies from SSLPrivateProxy. After the payment was processed, we received our package of 10 Instagram proxies, which you can see below.
We blurred the details because we are going to use these proxies for quite some time.
Returning to the question of Massplanner proxies, this proxy pack is perfect for social media tools as Massplanner because you can connect them via Username and Password.
The username and password authentication is an important aspect when considering buying proxies. Because some providers offer only IP based authentication but for convenience (sharing proxy details with your team) username authentication causes less friction.
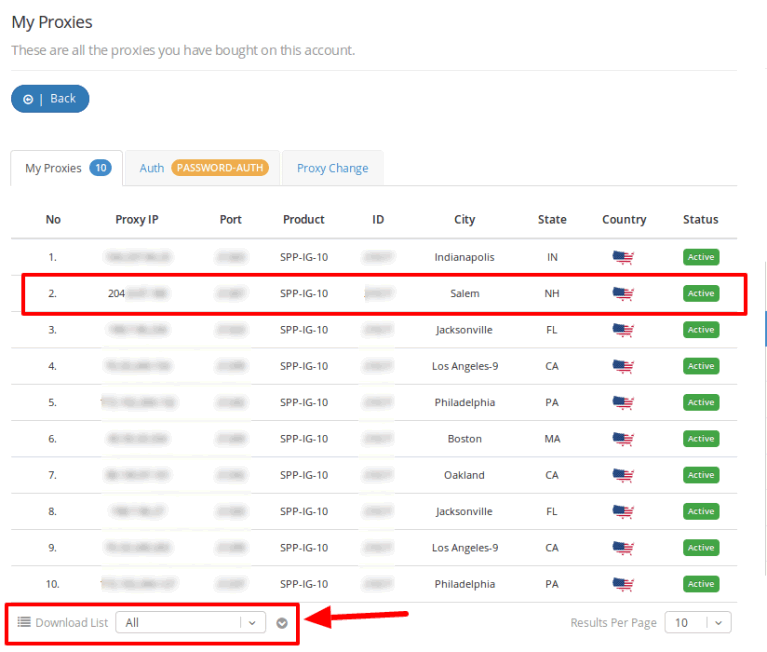
Download the proxies list for record
Furthermore, for ease of use, most proxies providers allow you to download your proxies list as a .txt file and store in your computer, as you can see below.
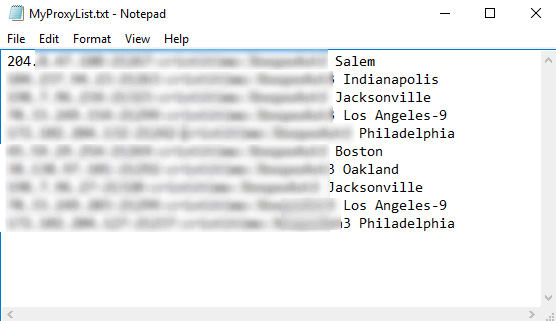
The list comes in handy when you need to set a tool through your proxies. Or when you have to change your server.
However, let’s pass to the actual Massplanner proxies tutorial. Now I am going to show how Massplanner proxies are set and verified prior to allocating your social accounts.
Open Massplanner, login and reach the Dashboard
Massplanner is a desktop-based software that works only on Windows machines. Moreover, being a desktop-based tool, it has to run 24-7 to perform its tasks. Therefore, my recommendation is to use Massplanner on a VPS, or Virtual Private Server.
Once you rented your VPS and downloaded Massplanner, install it, open it and login your account details to reach the Dashboard.
Select Proxy Manager
The Massplanner Dashboard looks like this.
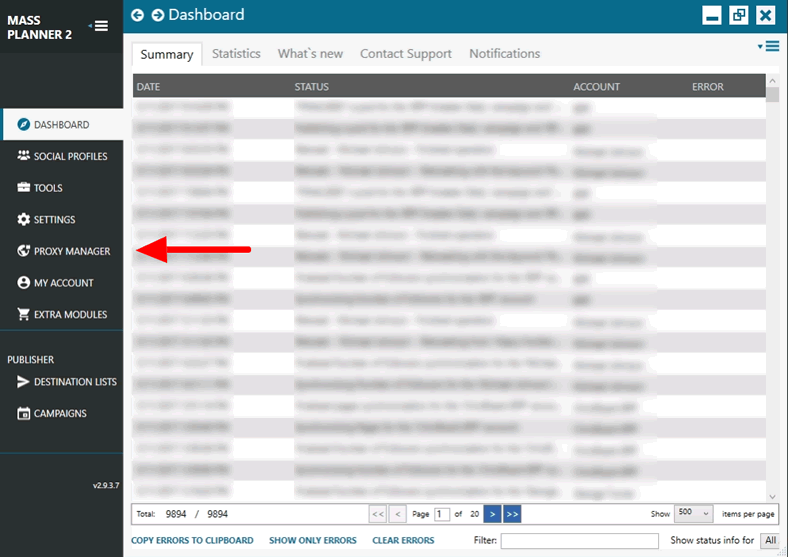
Once you reach the Dashboard – Massplanner proxies setup – start by selecting the ‘Proxy Manager’ tab.
Here you can manage your proxies, add new ones, verify them, delete flagged ones, add tags and assign social media accounts.
Add a proxy
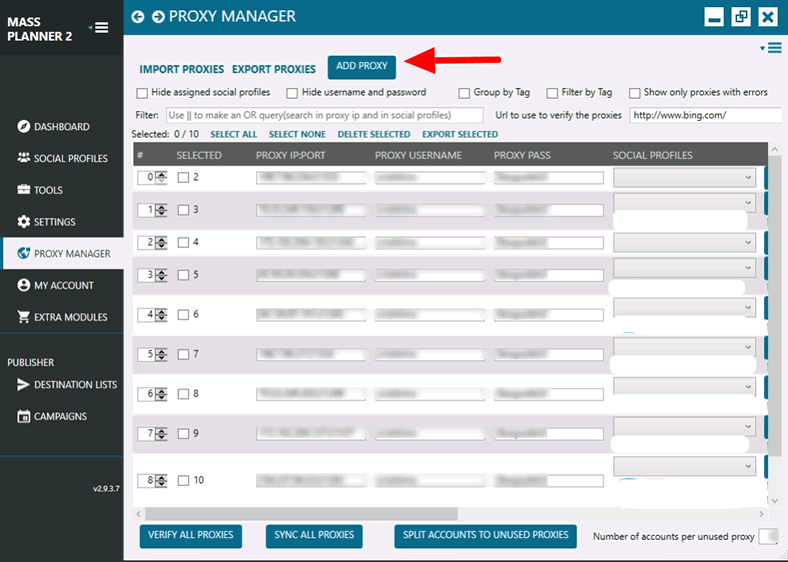
After the Proxy Manager tab opens, the first step in setting your Massplanner proxies is to click ‘Add Proxy’ to create a new row where to insert one of your Instagram proxies.
Click Verify All Proxies
When the new line of adding a proxy and inserting its details appear, you have to fill in the details simply. First, the IP and port, followed by the proxy’s authentication details, username, and password.
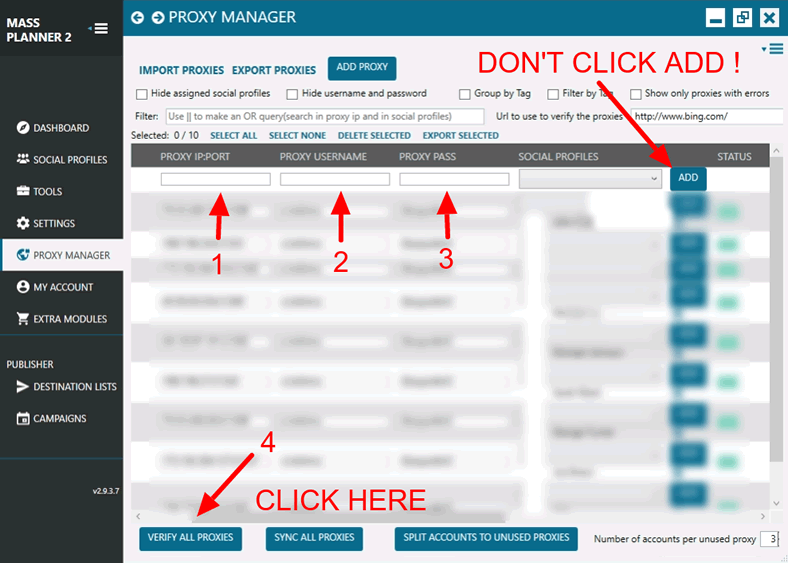
Pay attention and don’t click ADD on the left-hand side! Do not click because this is not the add your proxy to the list. This Add button is for account allocation. So for the moment, you do not have to click on it.
However, after filling your proxy details, you must click the ‘Verify All Proxies’ button at the bottom of the Dashboard. (The number (4) on the above picture.)
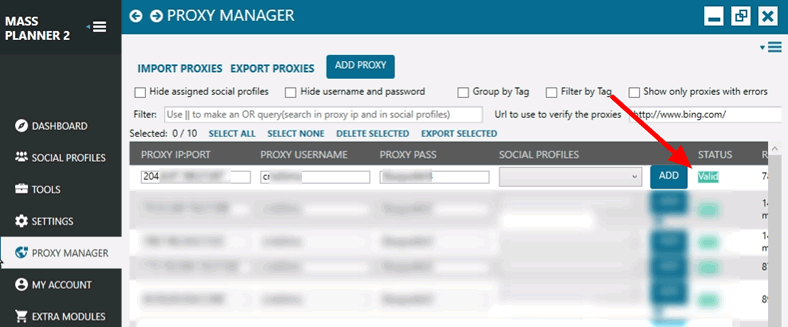
Your proxy is valid
After you have clicked on verify your Massplanner proxies, a ping is sent through your proxy to a particular website. In our case, the ping to verify your proxy is sent to bing.com (default option).
Now that your proxy is valid, you can add social media accounts and assign them to connect through your proxy. Now you can click on that ‘Add’ button sitting next to the proxy’s ‘Valid’ status.
The recommended ratio is one account per proxy. However, depending on your settings and social media platforms, you can play with this ratio.
Once your Massplanner proxies’ connection to the Internet has been validated. And you have assigned your social media accounts, you can start developing social media strategies and grow your audience.


